

You can create your own time lapse videos from log messages. It is not rocket science and is possible using a purely open source tool chain. In my previous blog, I explained how you can create a heat map from IP addresses in your log messages using syslog-ng, GeoIP, Elasticsearch and Kibana. Here we do a few more steps by configuring Kibana, taking regular screenshots and turning them into a video using OpenShot.
Before you begin
Unless you are only interested in learning how to create a time lapse using OpenShot, you should start by reading my previous blog about creating a heat map. It explains everything up to the point where you have your first heat map compiled from the geolocations of IP addresses on your screen: that is, you have a log source, you have parsed logs, sent them to Elasticsearch and are now displaying them in Kibana.
Creating a time lapse video requires installing a few more software on your machine:
- screenshot application: I used “gnome-screenshot” coming as part of Gnome
- a web browser: I used Firefox
- an application to rename screenshots: I used “pyRenamer”
- OpenShot to turn screenshots into a time lapse video
You will also need to turn off any screensavers on the machine where you capture the screenshots, otherwise you will be taking screenshots of a black screen.  Trust me, it is not that funny if you discover it only after a few hours…
I did everything in a virtual machine so my laptop was not blocked from use while the screenshots were being created.
Configuring Kibana
There are many ways you can show information in a time lapse video:
- You can create a cumulative map, starting with an empty map and showing all connection attempts right from the beginning till the end. The video will start with a few dots at the beginning and will end with larger colored areas, showing a summary of dangerous (more active) areas. In this case, you configure Kibana to show a whole day or week, so all addresses are displayed on the map.
- You can also rely on the rolling average of connection attempts. In this case, you configure Kibana to display only the last few minutes or hours on screen. The configured time interval will greatly influence the outcome:
- If you configure a shorter time interval, you will only see some quickly disappearing dots on the screen.
- With a longer interval, there is a chance for data to accumulate, having a similar effect as the cumulative map but with a new dimension: continuous change is also shown.
Another question is how often you take a screenshot. For my time lapses, I configured one screenshot a minute. For a busy network, 1 minute might be too long, for a quiet network, it could be too short. Make sure that when you are taking screenshots, you consistently use the same interval.
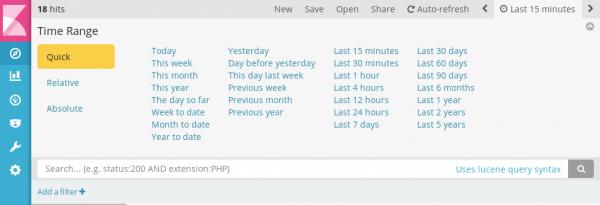
Both of these settings (Time Range and Auto-refresh) can be configured when you click the clock icon in the upper right-hand corner of Kibana:
Creating screenshots
Once you configured Kibana, it is time to start creating screenshots. Before doing that, however, you have one more step to do: maximize the browser window and make the browser full screen. This is not strictly necessary, but this way you don’t have to post-process the images to remove possibly sensitive data like your bookmarks.
My desktop environment, GNOME, has a bundled screenshot application: gnome-screenshot. If you use another desktop, you might need to install another application, like “screenshot-tool”. The only important feature is that the application should work from the command line.
Use this command line from a terminal window running on the same desktop:
while true ; do sleep 60 ; gnome-screenshot -B ; done
Where:
- while true ; do starts an endless loop, which you can break using the Ctrl-C keyboard combination.
- sleep 60 means that you start with a 60-second sleep period, so you have time to switch back to the browser window before screenshots are taken. If you configured a refresh rate other than 1 minute in Kibana, adjust the value here (in seconds).
- gnome-screenshot is the name of the screenshot application you are using on the command line.
- -B is used for two reasons: no window borders this way with gnome-screenshot and even more important: the application runs this way without a GUI.
- done marks the end of the loop.
All you need now is patience. I was collecting screenshots for a bit more than half a day. For a first experiment, an hour is enough (but be aware that this results in a 2-second time lapse video if you leave the default “30 frames a second” setting untouched). Once you have enough screenshots, switch to the terminal window and terminate the while loop using Ctrl-C.
Renaming screenshots
Depending on your screenshot application, image files are saved to different locations with different names. In the case of gnome-screenshot, files are saved under the “Pictures” directory in your home directory with names that include the date and time the image was created. For example, “Pictures/Screenshot from 2017-08-26 09-24-08.png”. Unfortunately OpenShot does not recognize image sequences this way. You need to rename image files so they have a sequence number in their name, starting with zero.
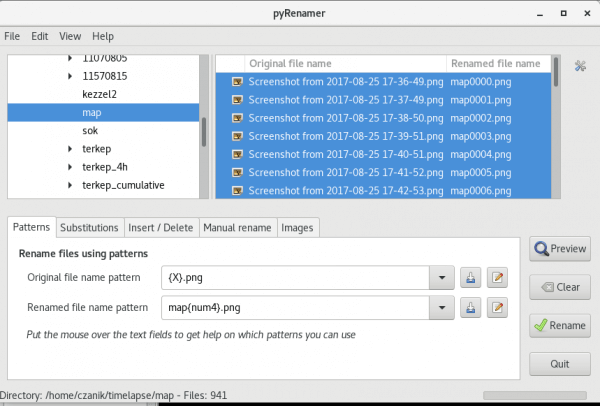
There are many tools available if you want to mass rename files. My choice was “pyRenamer”. Using “pyRenamer”, you can use a GUI to rename the files:
- Switch to the directory containing the images.
- Select the files.
- Set the “Original file name pattern” to “{X}.png”.
- Set the “Renamed file name pattern” to “map{num4}.png”.
- Click “Preview”.
- Click “Rename”.
Converting screenshots into time lapse video using OpenShot
The final step is to convert the screenshot files into a time lapse video. The use of OpenShot might be an overkill for this task as there are many command line tools which can do the job. On the other hand, OpenShot can hide away their complexities and has many additional features, like creating title screens (not covered here), which can come in handy.
When you start OpenShot, it will start up with an “Untitled Project” with no files and an empty time line. Here I describe only the minimal steps required to create a time lapse video. Check the OpenShot documentation if you want to add some sound or a title / end screen.
- Click “File” menu > “Import files”, search for the first screenshot in the file dialog, and click “Open”.
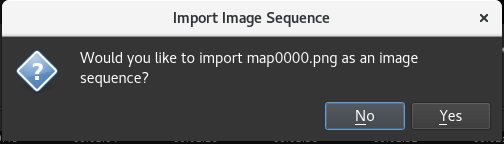
- Click “Yes” in the pop-up asking if you want to treat the image as an image sequence.
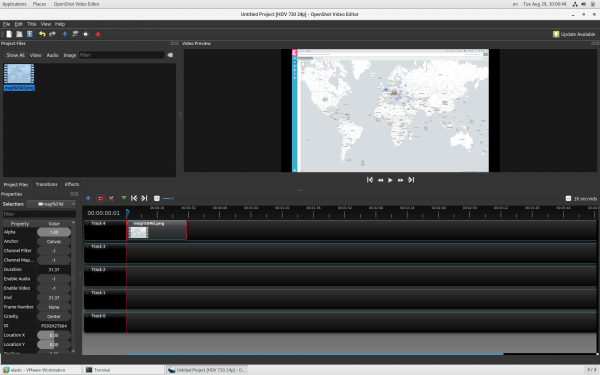
- The image sequence will show up as a thumbnail under “Project files”. If you want to change the frame rate (for example, to create a longer time lapse video from just a few screenshots), right-click the thumbnail, choose “File properties” and change the frame rate.
- Drag and drop the thumbnail to the timeline on any of the tracks. You should see a new thumbnail on the track and also a preview window.
- Click “Export video” in the “File” menu. Give the video a name. As we used 30 as the frame rate, choose a profile with 30 fps that suits your screen resolution.
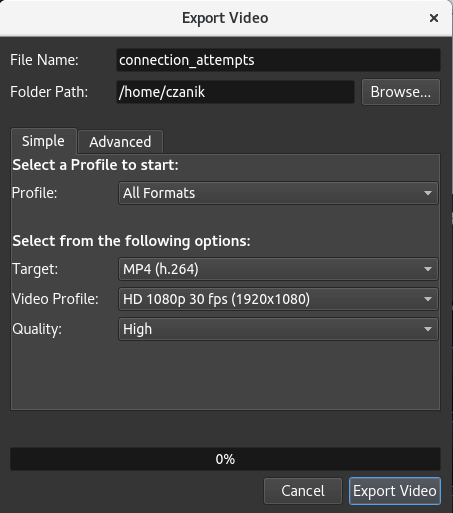
- Finally click “Export Video”, sit back and relax. Depending on your computer and amount of screenshots, your time lapse video should be ready in a matter of seconds or minutes.
What is next
Heat maps and time lapse videos are extremely powerful tools when it comes to visualizing large amounts of raw data. They can be especially useful when you wish to highlight trends and potential focus areas that merit further attention.
As usual, I omitted many details to keep my blog at a reasonable length. Here I list a few resources worth reading if you want to learn more or if you get stuck along the way:
- Creating heat maps
- Getting the latest syslog-ng packages
- syslog-ng documentation
- White paper with practical details about how to get started storing logs in Elasticsearch using syslog-ng
- Elasticsearch and Kibana documentation
- OpenShot documentation
While my blogs focus on the open source edition (OSE) of syslog-ng, you can use the latest release of syslog-ng Premium Editon as well to parse log messages and add geographical information.